This salmon teriyaki recipe is sticky, glossy, and ready in 20 minutes. Pan-seared salmon glazed with a homemade teriyaki sauce — better than takeout and incredibly easy.
Salmon teriyaki is one of those dinners that sounds more impressive than it is.
You’re making a simple four-ingredient sauce, searing salmon in a hot pan, and glazing it at the end. Twenty minutes. One pan. The sauce caramelizes on the salmon and creates that sticky, glossy coating that looks and tastes like restaurant teriyaki — because the technique is exactly the same.
The difference between this and a bottled teriyaki sauce from the store is noticeable. Homemade has a cleaner, more balanced flavor — the right ratio of soy to sugar to ginger — and it takes about two minutes to mix together.
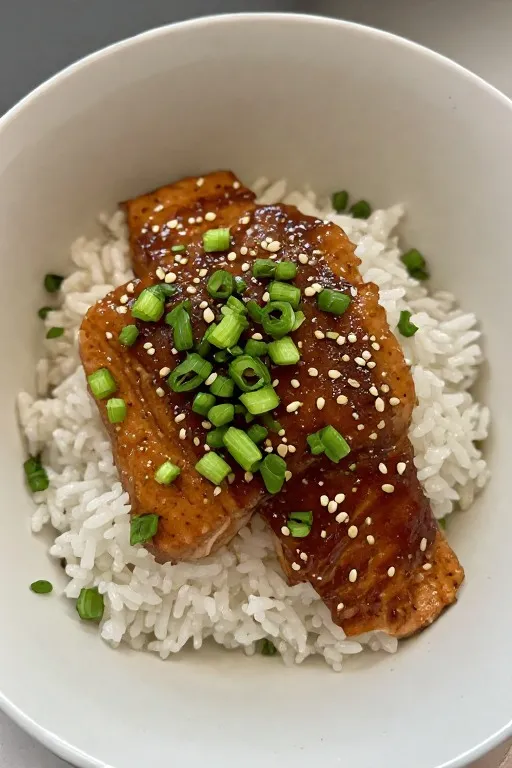
Serve it over rice with sesame seeds and green onions and that’s dinner done.
➡️ You should try this recipe next: Dump and Go Crockpot Teriyaki Chicken Recipe
If you’ve been making the baked Boursin salmon for easy weeknight fish dinners, this pan-seared teriyaki version belongs right next to it in your rotation.
Ingredients Overview
Salmon fillets are the protein. Skin-on fillets hold together better during the sear and the skin gets deliciously crispy when it hits a hot pan. Skinless works too if you prefer — just handle more gently. Wild-caught salmon has a deeper, more complex flavor than farmed. Either works here.
Low-sodium soy sauce is the savory backbone of the teriyaki sauce. Low-sodium is important — the sauce reduces and concentrates during cooking and regular soy sauce becomes very salty. Tamari is a gluten-free alternative with the same depth of flavor.
Brown sugar gives the sauce its sweetness and — more importantly — its ability to caramelize in the pan. The caramelization is what creates that glossy, sticky coating on the salmon. Honey works as a substitute and adds a slightly different floral sweetness.
Rice vinegar adds brightness and a subtle tang that keeps the sauce balanced rather than flat. A small amount but it makes a difference. Don’t skip it.
Fresh garlic and fresh ginger add the aromatic depth that separates a good teriyaki from a great one. Both grated fine on a microplane or minced very small so they melt into the sauce rather than sitting in it.
Sesame oil is stirred in at the end — off the heat — to preserve the nutty flavor. Sesame oil added too early or cooked at high heat loses its distinctive taste.
Cornstarch mixed with water creates a slurry that thickens the sauce into a proper glaze. Without it the sauce stays thin and doesn’t coat the salmon the way teriyaki should.
Olive oil or neutral oil for searing the salmon. You want enough heat in the pan to get a proper sear on the fish without burning.
Garnish: sesame seeds, sliced green onions, and steamed white or brown rice for serving.
How to Make Salmon Teriyaki
Make the Teriyaki Sauce
In a small bowl whisk together 3 tablespoons low-sodium soy sauce, 2 tablespoons brown sugar, 1 tablespoon rice vinegar, 2 cloves garlic minced, 1 teaspoon fresh ginger grated, and 1 teaspoon sesame oil.
In a separate tiny bowl mix 1 teaspoon cornstarch with 1 tablespoon cold water until smooth. Stir the cornstarch slurry into the sauce mixture. Set aside.
The sauce is ready in about 90 seconds. Don’t be tempted to use store-bought teriyaki sauce — the homemade version is genuinely better and takes no meaningful extra time.
Prep the Salmon
Pat the salmon fillets completely dry with paper towels. This is the most important step for a proper sear — wet salmon steams instead of searing and you won’t get the golden crust.
Season both sides lightly with salt and pepper. If skin-on, score the skin lightly with a sharp knife — 2–3 shallow cuts across the skin — to prevent it from curling in the pan.
Sear the Salmon
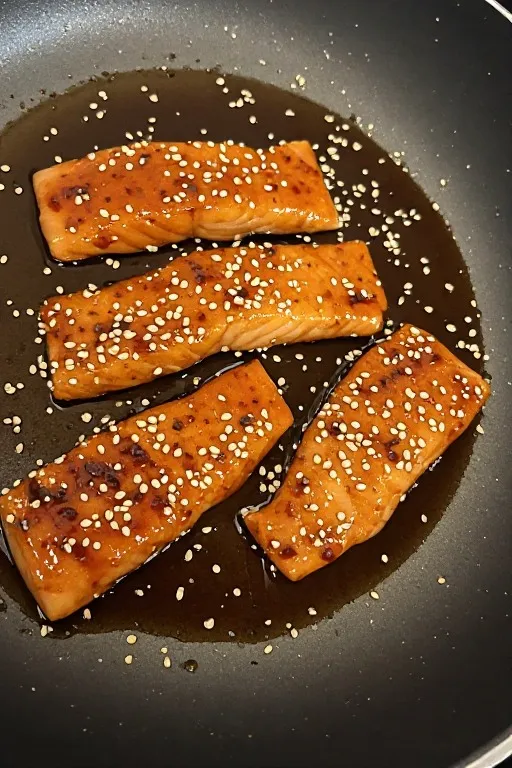
Heat 1 tablespoon of oil in a large skillet over medium-high heat until shimmering. Place the salmon fillets skin side down in the pan. Press gently with a spatula for the first 10 seconds to prevent the skin from curling.
Cook skin side down for 4–5 minutes without moving — until the skin is golden and crispy and the flesh has turned opaque about two-thirds of the way up the side of the fillet. Flip carefully and cook 1–2 minutes on the flesh side.
The salmon is done when it flakes easily at the thickest part and the internal temperature reads 125–130°F for medium or 145°F for fully cooked. Medium gives you a more tender, silky interior — fully cooked is firmer.
Glaze and Finish
Reduce the heat to medium-low. Pour the teriyaki sauce into the pan around the salmon fillets. Let it bubble and reduce for 1–2 minutes, stirring gently, until it thickens into a glossy glaze.
Spoon the glaze over each fillet as it reduces. The sauce will caramelize slightly on the salmon and the pan — that’s exactly what you want.
Remove from heat. Drizzle any remaining sauce from the pan over the fillets.
💚 Upgrade your meals with high protein recipes the whole family will love — check out The High Protein Cookbook, packed with delicious protein-packed recipes to keep you full and energized!
Tips for the Best Salmon Teriyaki
Dry the salmon completely. Pat both sides thoroughly with paper towels before the fish goes near the pan. Any moisture on the surface creates steam and prevents the sear from forming. Dry salmon + hot pan = golden crust. Wet salmon + hot pan = grey, steamed fish.
Start skin side down. Cooking the salmon skin side down first renders the fat in the skin and makes it crispy. It also protects the delicate flesh side from direct high heat. Most of the cooking happens on the skin side — the flesh side needs only 1–2 minutes.
Don’t move it. Once the salmon goes in the pan, leave it completely alone until it’s time to flip. Moving it breaks the crust and causes it to stick. When it releases cleanly on its own, it’s ready.
Add the sauce at the end. Teriyaki sauce added too early burns because of the sugar content. Sear the salmon first, get it almost fully cooked, then add the sauce and reduce it around the fillets in the last 2 minutes. This gives you the caramelized glaze without burnt sugar.
Don’t overcook the salmon. Salmon goes from perfectly cooked to dry and chalky quickly. Pull it at 125–130°F for a tender, silky medium. The carry-over heat will bring it up a few more degrees as it rests.
Rest briefly before serving. Two minutes of resting after coming off the heat lets the juices redistribute. It’s a short rest but worth it.
Variations
Baked salmon teriyaki. Place the salmon on a lined baking sheet, brush with the teriyaki sauce, and bake at 400°F for 12–15 minutes, brushing with more sauce halfway through. No searing required — a great hands-off option. Finish under the broiler for 1–2 minutes for a caramelized top.
Salmon teriyaki bowls. Slice the glazed salmon and serve over rice with shredded cabbage, sliced cucumber, edamame, shredded carrots, sliced avocado, and a drizzle of extra teriyaki sauce and sriracha mayo. A full meal prep bowl that holds up well for 3–4 days in the fridge. Pairs beautifully alongside the chickpea feta avocado salad for a high-protein lunch spread.
Add a spicy kick. Stir 1 teaspoon of sriracha or chili garlic sauce into the teriyaki sauce before cooking. The heat balances the sweetness of the brown sugar and adds complexity to the glaze.
Make it with pineapple. Add 2 tablespoons of fresh pineapple juice to the teriyaki sauce. The pineapple adds a tropical sweetness and slight acidity that works really well with salmon.
Use miso. Whisk 1 tablespoon of white miso paste into the teriyaki sauce. Miso adds an umami depth and a slightly fermented quality that elevates the sauce significantly.
Serve over noodles. Instead of rice, serve over soba noodles tossed with a little sesame oil and sliced green onions. The teriyaki sauce soaks into the noodles beautifully.
Ingredient Substitutions
Salmon → Chicken thighs or breasts use the same sauce and technique — cook chicken to 165°F. Shrimp cook in 2–3 minutes per side with the same glaze. Tofu — press it dry, cut into thick slabs, sear until golden, and glaze the same way. Any firm fish fillet works.
Low-sodium soy sauce → Tamari for gluten-free with the same depth. Coconut aminos for soy-free — slightly sweeter and less salty, adjust the sugar down slightly.
Brown sugar → Honey as a direct substitute — slightly different sweetness and caramelization. Maple syrup works too. Coconut sugar for a less refined option.
Rice vinegar → Apple cider vinegar in the same quantity. White wine vinegar works in a pinch.
Fresh ginger → ½ teaspoon ground ginger as a substitute. Fresh grated ginger on a microplane gives a cleaner, brighter flavor — worth using when you have it.
Cornstarch → Arrowroot powder as a 1:1 substitute. The sauce can also be reduced without a thickener — simmer longer until it naturally reduces to a syrupy consistency.
Storage
Cooked salmon: Store in an airtight container in the fridge for up to 3 days. Salmon reheats gently — microwave in 30-second intervals at 50% power to avoid drying it out, or eat cold over salad or rice bowls.
Teriyaki sauce: The sauce keeps in a sealed jar in the fridge for up to 2 weeks. Make a double or triple batch and keep it on hand for the week — it works on chicken, tofu, vegetables, and noodles.
Freezing: Cooked salmon freezes for up to 2 months but the texture softens slightly after thawing. Better to eat fresh or within 3 days from the fridge. The teriyaki sauce freezes well — freeze in an ice cube tray for individual portions.
Meal prep: The teriyaki sauce is the best thing to make ahead. Cooked rice keeps for 4 days. Assemble bowls fresh each day using pre-made sauce and freshly cooked or reheated salmon.
Frequently Asked Questions
Should I cook salmon with the skin on or off? Skin on is better for pan-searing — it protects the delicate flesh from direct heat and gets deliciously crispy when properly seared. If you prefer skinless, handle the fillets more gently and reduce the cook time on the flesh side slightly since there’s no skin layer to protect it.
How do I know when salmon is done? Use a fork to gently test the thickest part — properly cooked salmon flakes easily. A meat thermometer is more precise: 125–130°F for medium (silky and slightly translucent in the very center), 145°F for fully cooked (firmer and opaque throughout). The USDA recommends 145°F but most chefs pull it at 125–130°F for the best texture.
Can I use frozen salmon? Yes — thaw completely in the fridge overnight first. Never cook salmon from frozen in a hot pan — the outside overcooks before the center thaws through. Pat very dry after thawing since frozen salmon releases more moisture.
Why is my teriyaki sauce not thickening? Make sure the cornstarch slurry was fully dissolved before adding it to the sauce — undissolved cornstarch doesn’t thicken properly. Also make sure the sauce is actually simmering when you add it — it needs heat to activate. If it’s still too thin, mix another half teaspoon of cornstarch with half a teaspoon of cold water and stir it in.
Can I make this gluten-free? Yes — swap the soy sauce for tamari or coconut aminos and the recipe is naturally gluten-free. Everything else is already gluten-free.
What sides go well with salmon teriyaki? Steamed jasmine rice is the classic pairing. Steamed or roasted broccoli, edamame, shredded cabbage, or bok choy all work well alongside it. The oven roasted vegetables are an easy and naturally complementary side that goes in the oven while the salmon cooks on the stovetop.

Salmon Teriyaki Recipe Better Than Takeout
Description
This salmon teriyaki recipe is sticky, glossy, and ready in 20 minutes. Pan-seared salmon glazed with a homemade teriyaki sauce — better than takeout and incredibly easy.
Ingredients
Salmon:
Teriyaki Sauce:
To Serve:
Instructions
- Whisk together soy sauce, brown sugar, rice vinegar, garlic, ginger, and sesame oil in a small bowl. Stir in cornstarch slurry until smooth. Set aside.
- Pat salmon fillets completely dry with paper towels. Season both sides lightly with salt and pepper. If skin-on, score the skin lightly with 2–3 shallow cuts.
- Heat oil in a large skillet over medium-high heat until shimmering. Place salmon skin side down. Press gently with spatula for 10 seconds.
- Cook skin side down 4–5 minutes without moving until skin is golden and crispy and flesh is opaque about two-thirds up the side. Flip and cook 1–2 minutes on flesh side.
- Reduce heat to medium-low. Pour teriyaki sauce into the pan around the salmon. Let it bubble and reduce 1–2 minutes, spooning glaze over the fillets, until thickened and glossy.
- Remove from heat. Rest 2 minutes. Serve over steamed rice garnished with green onions and sesame seeds.
Nutrition Facts
Servings 4
- Amount Per Serving
- Calories 380kcal
- % Daily Value *
- Total Fat 18g28%
- Saturated Fat 3g15%
- Cholesterol 110mg37%
- Sodium 580mg25%
- Total Carbohydrate 12g4%
- Sugars 10g
- Protein 42g84%
* Percent Daily Values are based on a 2,000 calorie diet. Your daily value may be higher or lower depending on your calorie needs.
Note
Pat the salmon completely dry before it goes in the pan — any moisture on the surface prevents the sear from forming and you'll end up with grey steamed fish instead of a golden crust.Pat the salmon completely dry before it goes in the pan — any moisture on the surface prevents the sear from forming and you'll end up with grey steamed fish instead of a golden crust.
Add the teriyaki sauce only after the salmon is almost fully cooked — the sugar in the sauce burns quickly if added too early over high heat.
❤️ Your Support Means a Lot I'm a new food blogger, and every rating and comment helps me grow and reach more readers. If you enjoyed browsing this recipe, I'd truly appreciate a quick rating below and would love to hear your thoughts in the comments. Thank you for supporting my journey and being part of Jessica Healthy Recipes! ❤️